
Baby Red Sox Socks
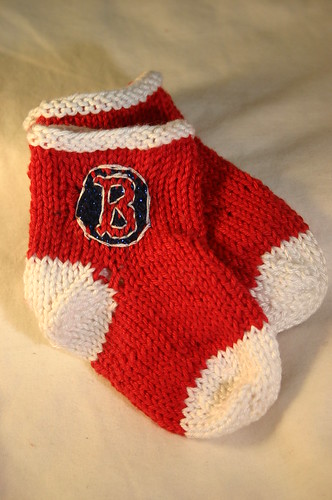
(click to see more images of finished socks)

Needles: Size 2 dpn
Yarn: Patons Grace (sport weight)
White, Red, and Blue
Cuff
Cast on 32 stitches in White. Divide onto 3 needles (11, 11, 10)
Join and Purl 2 rounds
Attach Red
Knit 4 rounds **
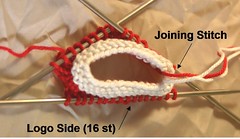
Keeping the joining stitch at the back, divide stitches 16, 8, 8 (for the right sock) or 8, 8, 16 (for the left sock.
The right sock with have the logo on the right, and the left sock will have the logo on the left.
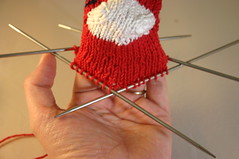
This photo shows the left sock.
Logo Intarsia
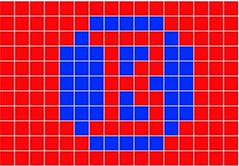
(Because we are starting at the cuff and working our way DOWN, make sure to read the chart from the TOP DOWN, always LEFT to RIGHT. This is different from traditional charts. Refer to the written directions below if you have trouble.)
Needle 1 (16 st) (Needle 3 for the left sock)
Row 1: K6 Red, K5 Blue, K5Red
Row 2: K5 Red, K1 Blue, K5 Red, K1 Blue, K4 Red
Row 3: K4 Red, K3 Blue, K1 Red, K2 Blue, K1 Red, K2 Blue, K3 Red
Row 4: K4 Red, K3 Blue, K1 Red, K1 Blue, K2 Red, K2 Blue, K3 Red
Row 5: K4 Red, K3 Blue, K3 Red, K3 Blue, K3 Red
Row 6: K4 Red, K3 Blue, K1 Red, K1 Blue, K2 Red, K2 Blue, K3 Red
Row 7: K4 Red, K3 Blue, K1 Red, K2 Blue, K1 Red, K2 Blue, K3 Red
Row 8: K5 Red, K1 Blue, K5 Red, K1 Blue, K4
Row 9: K6 Red, K5 Blue, K5Red
Continue knitting needles 2 and 3 normally in Red.
After intarsia, knit 4 rounds in Red. **
Redistribute stitches 16, 8, 8, with joining stitch in the center of needle 1.
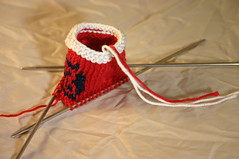
Heel
Knit across the 16 stitches on needle 1 with some waste yarn in a contrasting color. Then go back to the right side of Needle 1 and knit across the waste yarn with the Red yarn. Work as usual in Red for six rounds, then place ALL stitches on a stitch holder.
Remove the waste yarn while placing the 2 rows of live stitches (top and bottom) on 2 needles. You should have 32 live stitches. Pick up 2 stitches in each gap between the two needles.
Divide stitches 9, 9, 9, 9.
(Needle 1 runs from the center of the back to the first "hole")
Attach White.
Knit 1 round White, K2tog at the end of each row (8, 8, 8, 8)
Decrease every other round as follows:
Needle 1: Knit to 3 stitches from the end, K2tog, K1
Needle 2: K1, SSK, Knit to end
Needle 3: Knit to 3 stitches from the end, K2tog, K1
Needle 4: K1, SSK, Knit to end
Continue decreasing every other row until you have 16 stitches. Combine stitches onto 2 needles, with the reduced stitches on the ends.
Use the Kitchener Stitch to fasted these 16 stitches.
Instep
Pick up your Red live stitches on 3 or 4 needles. Work for 9-10 rows. **
Divide stitches 8, 8, 8, 8, lining up needles with the heel edges.
Toe
Switch to White yarn and knit 1 round.
Decrease every other round as follows:
Needle 1: Knit to 3 stitches from the end, K2tog, K1
Needle 2: K1, SSK, Knit to end
Needle 3: Knit to 3 stitches from the end, K2tog, K1
Needle 4: K1, SSK, Knit to end
When you have 16 stitches remaining, divide the stitches between 2 needles (will need to k4 on the last needle).

Use the Kitchener Stitch to fasten off.
Weave in all loose ends.
Outline Logo with white embroidery thread.
** to reduce the look of a "seam" between needles:
When you get to the end of needle 1, knit one extra stitch from needle 2 directly onto needle 1. Repeat at the end on each needle as you go around. If you tend to have a tighter or looser stitch at the ends of your double pointed needles, this will disburse them around the sock and keep it from making a seam.

0 comments:
Post a Comment