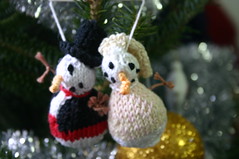
Monday, May 31, 2010

The best pillows are hand-made

I'm glad to see my months of hard work are being put to good use.


The best face pillows are hand-made

Sunday, May 30, 2010

May the Crafts be with You.

Not sure how it happened, but I fell down a Star Wars crafty wormhole the other day.


It started when I saw a picture of new baby Natalie wearing this super cute hat:


I asked Mom Laurie if she had the pattern, and she sent me to Cloo Gifts's Etsy Page.

I then went searching Ravelry to see if anyone had a similar pattern.

I found this, a "Kitty Cat" by Kerli. So CUTE!!!

I then came across every animal hat imaginable, including this chicken hat,
which just makes me giggle, and this Yoda Hat,
which gets me a little excited.

So, of course, I began thinking "How many other Star Wars hats are there?" The answer is, of course, billions and billions.

A few of my favorites:


I'm always looking for cute baby gifts, and I know a few people who would really appreciate these (not to mention how excited my husband would be to dress his child like Yoda).

Thursday, May 27, 2010

We're moving!!!

Ok, this has nothing to do with knitting, but I'm just too excited!


Last night C and I had an interview with the co-op board for the apartment we're buying. It went great!!! We got the official word today so now we can schedule our closing. We're so close!!!

Needless to say, I'm a little distracted at work today, so I let out some creating juices making an address change card to send to our friends and family, featuring my adorable dog, Gipper.

moving copy

Tuesday, May 18, 2010

Bride and Groom Snowmen Ornaments

Knitted Bride and Groom

Print Friendly and PDF

A great gift for newlyweds celebrating their first holiday season together. Customize the colors to match the couple’s wedding attire or theme.

Materials
Size US 1 (1.25mm) dpn (x5)
Tapestry Needle
Card stock
Cotton Stuffing

Yarn
Patons Grace (or similar Light/#3 yarn)
Colors Used in this pattern:
White, Black, Red, Pink,
Natural, Orange, Brown

Pattern
Knitted Bride and Groom
The Groom, Body:
Cast on 8 stitches, white; separate onto 4 dpn (2-2-2-2)
Row 1: [Kfb, K to end of needle] X 4 (3-3-3-3)
Rows 2-7: Repeat Row 1 until you have 36 stitches (9-9-9-9)
Attach Red
Rows 8-10: Knit 3 Rows of red
Attach Black
Row 11: K2 black, K5 red, K2 black; K9 black; K9 black (9-9-9-9)
Row 12: K3 black, K3 red, K3 black; K9 black; K9 black
Row 13: K3 black, K3 white, K3 black
Row 14: K3 black, K3 white, K1 black, K2tog; K7 black, K2tog; K7 black, K2tog (8-8-8-8)
Row 15: SSK black, K1 black, K3 white, K2 black; K6 black, K2tog; K6 black, K2tog (7-7-7-7)
Stuff part of the body now, before the opening gets too narrow
Row 16: K2 black, K3 white, K2tog black; K5 black, K2tog; K5 black, K2tog (6-6-6-6)
Row 17: SSK black, K3 white, K1 black; K4 black, K2tog; K4 black, K2tog (5-5-5-5)
Row 18: K1 black, K2 white, K2tog white; K3 black, K2tog; K3 black, K2tog (4-4-4-4)
Row 19: SSK white, K2; K2 black, K2tog; K2 black, K2tog (3-3-3-3)
Row 20: [K1 white, K2 tog] X 4 (2-2-2-2)
Finish stuffing body

Head:
All white
Row 21: [Kfb, K to end of needle] x4 (3-3-3-3)
Rows 22, 23: Repeat Row 21 until you have 20 stitches (5-5-5-5)
Rows 24-26: Knit 3 rows
Stuff part of the head
Row 27: [K3, K2tog] x4 (4-4-4-4)
Rows 28-30: Repeat Row 27, decreasing the last 2 stitches of every needle, until you have 4 stitches (1-1-1-1)
Finishing stuffing head
Cut yarn and thread through remaining stitches

Carrot Nose:
Cast on 3 stitches Orange
Use I-Cord technique (see below for details)
Rows 1-3: Knit all stitches
Row 4: K2tog, K1
Row 5: K2tog
Cut yarn and thread through the center of carrot. Use tail to attach to
face.

Top Hat:
Cast on 6 stitches Black; separate onto 3 needles (2-2-2)
Row 1: Kfb on all stitches (4-4-4-4)
Rows 2-8: Knit all stitches
Row 9: Kfb on all stitches (8-8-8-8)
Cast off all stitches
Cut a 1"x3" rectangle strip of card stock. Roll and trim the strip so it fits inside the top hat. This will help keep the shape and flatten out the top of the hat.
Attach to the hat to head

Other Details:
Add knots of black for eyes, mouth, and buttons (not shown)
Tie a square knot for a bow tie.
Thread brown yarn through body for arms. Tie short pieces onto the
ends for hands.

The Bride, body:Knitted Bride and Groom
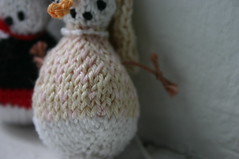
Cast on 8 stitches, white; separate onto 4 dpn.
(2-2-2-2)
Row 1: [Kfb, K to end of needle] x4 (3-3-3-3)
Rows 2-7: Repeat Row 1 until you have 36 stitches (9-9-9-9)
Attach Natural and Pink
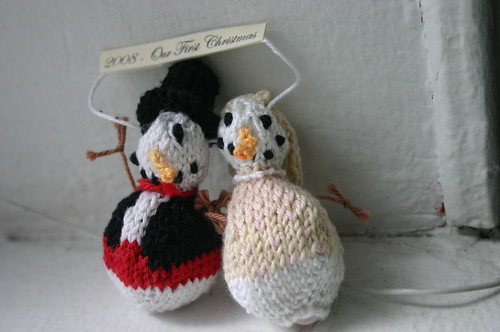
Rows 8-13: Knit 6 Rows of “wedding dress”. In the picture shown, I alternated knitting 2 stitches of Natural, and 1 stitch of Pink, making sure to off-set the Pink in each row, as not to create stripes. Glittery yarn may also work nicely here.
Row 14: K7, K2tog; K7, K2tog; K7, K2tog (8-8-8-8)
Rows 15-20: Repeat Row 14 until you have 8 stitches (2-2-2-2), stuffing the
body along the way.

Head
All white
Row 21: [Kfb, K to end of needle] x4 (3-3-3-3)
Rows 22, 23: Repeat Row 21 until you have 20 stitches (5-5-5-5)
Rows 24-26: Knit 3 rows
Stuff part of the head
Row 27: [K3, K2tog] x4 (4-4-4-4)
Rows 28-30: Repeat Row 27, decreasing the last 2 stitches of every
needle, until you have 4 stitches (1-1-1-1)
Finishing stuffing head
Cut yarn and thread through remaining stitches

Veil
Knitted Bride and Groom
Cast on 13 stitches
Rows 1-2: stst 2 rows
Row 3: K1, [yo, k1, k2tog]; Repeat [ ] until 1 stitch remains; K1
Row 4: Purl all
Rows 5-8: Repeat Rows 3 and 4 for 4 more rows
Starting at Row 9, begin decreasing, depending on the shape you want your veil to be.
For the photos shown, I decreased like this:
Row 9: K2tog, [yo, k1, k2tog]; Repeat [ ] until 2 stitches remain; K2tog
Row 10: P2tog, Purl all until 2 stitches remain; P2tog
Row 11: K2tog, K2, K2tog . . . Etc
Until there were 3 stitches left
Cast off
Use the tail at the end to sew onto head. Use the tail at the beginning and thread through the bottom seam. Pull tight to add some puckering to the veil.

Necklace
Tie knots close together on a piece of white yarn, and tie around the neck. You may want to attach the ends to the back of the neck, so it stays put.

Other Details:
Add a carrot nose, eyes, mouth, and arms as you did for the groom.
Tie to bride and groom’s arms together.
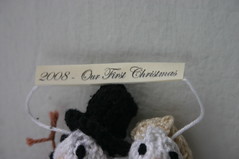
Knitted Bride and Groom
Hanger:
Print your message on card stock and cut it out. Fold the card stock in half with the seam along the bottom. Thread a piece of yarn through the snowmen’s heads (or wherever looks best to you) and tie in a knot. Sandwich the yarn in the fold of the card stock and tape closed at the top.

Key
stst = Stockinette Stitch
yo = Yarn Over
K2tog = Knit 2 stitches together
Kfb = knit into the back of the stitch to increase 1.
SSK = Slip 2 stitches knitwise. Insert left needle into the front loops of the
slipped stitches and knit them together from this position (through the back loops).
(2-2-2-2) = indicates 2 stitches on 4 needles, total of 8 stitiches
I-Cord = Knit a row. Slide row to other end of needle. Do not turn the work. Repeat.

Knitted Bride and Groom Knitted Bride and Groom

Saturday, May 8, 2010

Mario Pillow - Finished!!!

At long last, the infamous "Mario Pillow" is DONE!!!

Mario Pillow (1)
Mario Pillow (5)

I began this project last June, intending to finish it by the end of the summer -- HA!!! I had come across Gege Crochet's "Mario Obsession Blanket" while rummaging around Ravelry, looking for a good project. My husband was sitting on the couch with me and looked over and saw the picture.

"OH MY GOD!!!" he shouted. "Can you make that?!?!?!" "Um . . ." I replied, "maybe not a whole blanket, but maybe a smaller version of that, ok?"
I started reading through her blog posts about it, seeing if she had patterns or instructions, and read that she had used Tunisian crochet. "Nevermind," I said initially, as I didn't know how to crochet, nor had I ever HEARD of Tunisian crochet. But I love my husband dearly, so I overcame by fear of the unknown and of failure, and ventured on.
Turns out, Tunisian crochet is so EASY! For those of you who have never tried, it's basically a cross between knitting and crochet. I won't try explaining it, but I learned it in about a day, thanks to the gods at YouTube.I also found a Tunisian group on Ravelry.com which also answered a lot of my questions once I got started.


The great thing I learned about Tunisian crochet, and why it is such a good technique for video game patterns like this, is that the stitches are square. Knitted stitches are rectangular, so a pattern with square pixels will look stretched out when knitted.

Design

I let Chris choose which Mario "scene" he wanted, and he chose a castle level fighting King Bowser. I found some great background and character images online, and for most of them I was able to copy and paste them right into the Photoshop.

I did a small test to figure out my gauge, and played around in Photoshop to see how much of a "scene" I could fit onto a small, pillow-sized pattern. I calculated that for a 30"x30" pillow (big and huggable!) I would need a pattern 100x100 pixels. Here's what I came up with!

(Mario has just jumped over Bowser and is about to WIN!!!)

In order to take digital patterns with me, I do the following:
  • Turn on the grid in Photoshop (a grid line for every pixel, and a thicker line every 10 pixels) and zoom in all the way
  • Click "print screen" on the keyboard and paste the picture into Microsoft Publisher (I find it easier to print and manipulate in Publisher, though I guess you could paste it back into a printable-sized Photoshop file). This way, you can print the image with the grid easily visible. It takes a few screenshots to get the whole image, because you're zoomed in so far.
  • Position the images on the document and print. I ended up printing this project on big 11x14 paper on the printer at work.

Materials

I have a confession . . . I like cheap yarn. I don't make fancy sweaters for fancy people. I make hats and gloves, meant to get snowed on; I make quilt squares for charity blankets, meant to be tossed on the floor by rowdy teenagers; and I make baby booties and jumpers, meant to be puked on. I don't waste my money on fancy yarn. And as I began to realize how big this pillow was going to be, I realized I had to do some comparison shopping for cheap yarn. I settled on Vanna's Choice, mainly because they had all the 8-bit colors I needed, and because I could order it in bulk from Amazon.com. I had some Amazon coupons, and I stumbled across a "buy 3 get one free" promotion, plus the free shipping -- pretty good deal! I was so excited the day the shipment came!


And it begins!

I started the actual crocheting at the beginning of June 09. It was not difficult, though I messed up counting a few times, and it's nearly impossible to go back and fix mistakes in Tunisian. I had to learn about to keep all the colors straight, as there are a lot of stripes and back and forth at the beginning. I ended up creating little "spools" out of plastic chip clips, which helped keep the skeins from getting tangled.

I brought the project with me on vacation, and was able to finish all the crocheting by Labor Day!


Unfortunately, because the hard part was over, my gusto was gone and the thought of assembling the damn just exhausted me. I was able to sew the sides together, and gather the materials I needed for the rest (Velcro for the closure, fabric for the lining). But to my dear husband's disappointment, the pillow sat folded over the back of the couch for MONTHS!!! I hate sewing, by the way, and I don't have a sewing machine, so I had no desire to spend hours stitching the lining and attaching the Velcro by hand.

Fast-forward to a few weeks ago. We are moving in June, so I am using up yarn and finishing projects, just so they don't get lost in the shuffle. I figured it would be easier to move a completed pillow than to move the pieces (including 2 bags of stuffing). After much grumbling, I measured out the fabric and started sewing. It wasn't as bad as I anticipated, and some of my favorite DVDs helped pass the time. Finally, my friend Emily needed a project last night, so she helped me finish up.

It feels SO good to have it done, and I'm very proud of how it came out. Chris is pretty happy, too.

Friday, May 7, 2010

Daily Google-ing

From my daily "weird knitted stuff" Google Search:


Knitted Christmas Tree Lights
Wouldn't put them on my tree, but maybe around a door frame?

Knitting Tatoos
(this last one is from the KIA commercial with all the dolls -- LOVE IT!)

Key Covers . . . that's actually kinda clever.
The Nail Polish I have on my keys wore off a long time ago.

Fraggle Rock Knitting Song

What a great way to start the day!


Snagged from Craftzine blog

Monday, May 3, 2010

More organizing day-dreams

Things are slow at work (things=me), so I'm running down the clock by day-dreaming about my new crafty corner (the corner of our new living room that I will slowly take over). At first, I will probably just use the 2nd bedroom. However, as my goal is to fill that room with babies as soon as humanly possible, I need to backup plan.


Also, I love Google, because you can search things like "How to organize yarn", click Image results, and your work is done.

I want the storage to be pretty, like a fancy yarn shop. When I go to yarn stores, I love the way the shelves look almost as much as I love touching the cashmere.

So I want something more like this
I love color!!!
and less like this


Just a few ideas . . .

Magazine Holders
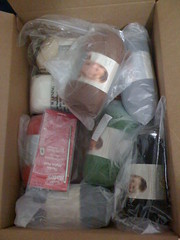
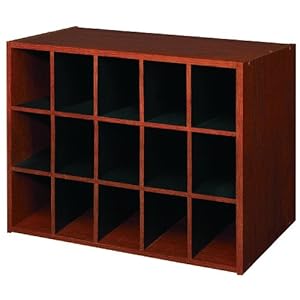
Along the same lines, I could turn the holders around and cover them with super cute wrapping paper; this way, I could make them pretty and match-y, even if my yarn leftovers don't compliment to room's decor.


And for a cheap alternative, I can make the magazine holders out of cereal boxes. Luckily, my husband LOVES his cereal, and hopefully it will be cheaper once we move out of Manhattan ($6.50 for Cheerios! I don't think so!!!).


Hanging Canvass Shelf


Depending on where this corner ends up, I may or may not have a closet, so I'm not sure where these would hang. However, I could mount the top "shelf" to the wall, and hang it from there.


Shoe Organizer
Image a few of these stacked on top of each other, or lined up side-by-side along a wall?


And finally, this is less practical, but adorable: